Navigating the Offer Process

The time has come to let go of your current home, and congratulations, you got an offer from a prospective buyer! Now, the question is, what should you take into consideration when looking at an offer? Here’s what you and your REALTOR® should look at when deciding whether to accept or reject an offer, because the highest offer may not be the best choice.

The Earnest Money Deposit

An earnest money deposit is the money a buyer is offering to pay when the sales agreement is signed. This money, which is usually 1-3% of the house’s cost, gets held by the title company and put towards the buyer’s down payment during closing. If a buyer tries to back out of a sale without reason, this money is given to the seller. So, the higher the earnest money deposit, the more serious a buyer is about buying a home.

Contingencies

Contingency agreements must go through before a home is sold. The fewer contingencies, the quicker a home sale will be complete. There are five common contingencies, including:

  • Home inspection
  • Appraisal
  • Financing
  • Sale of current home
  • Title

While an appraisal contingency is required to approve a loan, you can talk with your REALTOR to determine if you’d like to negotiate any of the other contingencies.

Cash Offers

The more a buyer puts down for a home, the more likely a lender will approve their loan. Cash offers typically lead to quicker closings, as a mortgage lender doesn’t need to be involved, there’s less risk of the offer not panning out and appraisals aren’t necessary.

Closing Date

A typical home sale, from offer to closing, takes between 30 to 60 days. Your circumstances, combined with the seller’s, may determine what offer you take. For instance, if you already purchased a new home, you may be looking for a buyer who can close quicker.

As always, your REALTOR® will be able to guide you through the selling process. If you’re thinking about buying or selling, start your REALTOR® search here.

Habits That Will Save You Money on Utilities 

We’re all looking for ways to cut costs and save money. According to Numbeo, the average price of utilities, including electricity, heating, cooling, water and garbage, in Chicago costs $163.52 per month for a 915 square foot apartment. However, there are small habits you can build into your day-to-day life that will add up to save you money in the long run.

Switch to LED Bulbs

LED bulbs use 75% less energy than traditional incandescent bulbs and can last up to 25 times longer. Not only will switching your bulbs save you money on your energy bill, but you will also save money by replacing bulbs less frequently.

Unplug Electronic Devices or Appliances

Electronic devices and appliances continue to use a small amount of energy even when they are plugged in, even if they’re not in use. Either unplug them or use a power strip that you can turn off to avoid spending additional money when these items are not in use.

Open Air Vents & Keep Them Clear

It may seem obvious, but when you turn on your air conditioning for the first time in the summer, check all of your vents to make sure they are open and air is moving through them. Also, it’s important to ensure no large pieces of furniture or other items are in front of your vents. These changes will help your air conditioner work less, thus saving you money!

Replace Your Filters

When your filters are full of hair, dust and dirt, your heating and cooling units have to work harder to maintain the temperature in your home. Keep your heating and air conditioning units running efficiently by replacing the filters quarterly.

Wash Your Clothes in Cold Water

Running cold water costs less than using warm or hot water, so switch your settings when you throw in a load of laundry!

Air Dry Your Laundry

Speaking of laundry, try air drying your clothes after a wash instead of using the dryer!

Utilize Your Ceiling Fans

If it’s not hot enough to turn on the air conditioning, but you want to cool down a room, utilize your ceiling fan! Fans can cool your room down by 10 degrees and use a fraction of the energy your air conditioning unit would.

By implementing these simple changes, you can save money on your utility bills and reduce your carbon footprint, which is a win-win for both your wallet and the environment!

Debunking Common Homebuying Myths 

When purchasing a home, there are many things that come into consideration, however, some of the most common things that you might hear about purchasing a home might not tell you everything you need to know about purchasing a home. Here are some common myths you may hear about when purchasing a home and the real story behind them.

You need to put down a 20% down payment.

While it is true that a larger down payment can sometimes lead to a lower mortgage rate, it is not always necessary to put down a large amount of money. There are several programs available that allow homebuyers to put down as little as 3% or even 0% of the purchase price. In fact, the average first-time homebuyer puts down 7% on their home.

You need high credit to qualify for a mortgage.

Credit scores are a vital part of getting approved for a loan to buy a home. The better your credit score, the better your loan terms will be, although, you can get a mortgage with a lower credit score as low as 580.

You need a 20% down payment to avoid private mortgage insurance (PMI).

PMI is insurance that protects a lender if the borrower defaults on their mortgage. While it is true that a down payment of 20% or more will typically allow you to avoid PMI, it is not the only way. Some lenders offer programs that allow homebuyers to avoid PMI with a smaller down payment, or even with no down payment at all. Make sure to shop around for a loan, and ask them about PMI.

A REALTOR® isn’t necessary.

While it is possible to buy a home without a REALTOR®, it can be a complicated and time-consuming process. A REALTOR® can help you navigate the process, negotiate on your behalf and provide valuable insight and advice. Here is a list of ways using a REALTOR® will help make your transaction easier.

A Closer Look At Closing Costs

Closing costs are a one time payment that is made on your home on the day the sale closes. However, not all closing costs are created equal. Some are negotiable, while others are set in stone. Here is what you need to know about them.

Overview of Closing Costs

Closing costs, in short, is the money you must pay when you buy a house. These fees for a home can vary depending on the price and type of home you are purchasing. They cover every expense associated with buying a house — from legal fees to property taxes to an inspection.  

There are several costs that you should budget for if you’re planning on buying a home.

Common Closing Costs

  • Loan Application Fee
  • Appraisal Costs
  • Attorney Fee
  • Closing Fee
  • Credit Reporting Fee
  • Escrow Funds
  • Homeowner’s Insurance
  • Loan Origination Fee
  • Title Insurance
  • Property Taxes
  • Transfer Tax
  • Underwriting Fee

Depending on how much money you’re putting toward a down payment, the type of mortgage, the type of home, the location of the home and other considerations, you may end up having to other additional fees.

Budgeting for Closing Costs

In general, closing costs are typically between 2% and 5% of the property’s purchase price. For example, if you are purchasing a home for $300,000, your costs could range from $6,000 to $15,000.  However, it is important to keep in mind that this is just a rough estimate, and the actual amount you pay could be higher or lower depending on a variety of factors.   

To determine how much you will have to pay, you should work closely with your lender and REALTOR®. They can help you understand the various fees associated with purchasing a home and provide you with a detailed list of anticipated costs. You can ask your lender for a loan estimate, which provides a similar breakdown of costs but also includes information about the terms of the mortgage.  

Budgeting for closing costs is an important part of the homebuying process. To prepare for these costs, you may want to set aside a specific amount of money in a savings account. You may also be able to negotiate with the seller or lender to reduce the closing costs, although this may not be possible in all cases.  

Ensure that you review all costs before signing the final purchase agreement to understand all the fees involved. By being prepared and budgeting for these fees, you can make the homebuying process as smooth and stress-free as possible.

7 Steps to Prepare Your Home to Sell

Selling your home is not always a straightforward process. Sometimes, it can be complex and time-consuming, but understanding the steps to successfully sell a home will ease your stress. By knowing how to get your house selling ready, you can make sure that your home is selling at the price you want and ensure the process go smoothly. Here are some tips for getting your home ready to sell:   

Clean & Declutter

Before you start showing your home to potential buyers, it is important to give it a thorough cleaning and declutter as much as possible. Remove any personal items and excess clutter, and consider hiring a professional cleaning service to give your home a fresh, clean look.  

Make Necessary Repairs

Fix any broken or damaged items in your home, such as leaky faucets, broken windows or chipped paint. These small repairs can go a long way in making your home more appealing to potential buyers and increasing its value.  

Stage Your Home

Staging your home means making it look attractive and inviting to potential buyers. This can include rearranging furniture, adding decorations and making sure the home is well-lit and welcoming. Staging your home can help potential buyers visualize themselves living in the space. Consider hiring a professional stager or using your furniture and décor to create a cohesive and inviting look.  

Price It Right

Setting the right price for your home is crucial to selling it. When setting a price for your home, it is important to be realistic. You should consider factors such as the condition of your home, its location and comparable sales in the area. Research comparable homes in your area to get a sense of what your home is worth. Your REALTOR® will help you along this process, make suggestions and ensure you’re set up for success!

Market Your Home

In today’s market, it is important to use a variety of marketing strategies to get your home noticed. This can include listing your home on websites, as well as utilizing social media and other online platforms to highlight your home.  Also, your REALTOR® will have an arsenal of time-tested ways to ensure your house is being marketed to the right people, so make sure to utilize their skills.

Be Prepared for Showings

When potential buyers come to see your home, make sure it is ready for them. This means keeping it clean and tidy, turning on all the lights and having a good supply of fresh towels and linens for any potential buyers who may want to see the bathrooms.  

Be Flexible

The process of selling a home can be unpredictable, and you may need to be flexible to close the deal. This may mean being open to negotiations, making repairs or updates at the request of the buyer or adjusting your selling timeline.  

By following these tips, you can increase the appeal of your home and make it more attractive to potential buyers. Remember to be patient and keep an open mind as you navigate the process of selling your home.

three people looking at documents

Listing Agent: The Key to Finding the Right Person

Home is where the heart is, and if you’re ready to sell your current home, you want to make sure you’re putting your trust in the right hands. Your listing agent will work with you to price and market your home, negotiate with buyers and help with closing the deal.

Here’s how to find an expert that works with you and your needs.

Know Your Timeframe

Have a listing date in mind? Backtrack six to eight weeks before that time, and aim to hire a listing agent around that time.

This will give you both the time to prepare to go live with your listing. For you, that might mean making repairs or upgrades. For your agent, that means working on creating a polished listing, ideas for marketing the house, pricing and more.

Begin Your Search

As you approach that ideal time to hire a listing agent, start researching professionals.

You can search for a Chicago REALTOR® here, or ask friends and family for recommendations. Remember, it doesn’t hurt to shop around. You’ll be working side by side with your agent, so make sure you find someone your trust to do the job.

Conduct Interviews

Take the recommendations and research you’ve done to set up interviews with agents. Here are some suggested questions that will help you determine if an agent is the right fit for you:

  • How long have you been in the real estate business?
  • What’s the price range of the homes you typically sell?
  • What is your fee?
  • How do you market homes?
  • How long are your homes usually on the market?
  • What’s your communication style?

During these interviews, make sure the agents understand your goals and meet the expertise qualifications or personality you’re looking for. If you follow those two desires, you’ll be sure to find a listing agent that works for you!

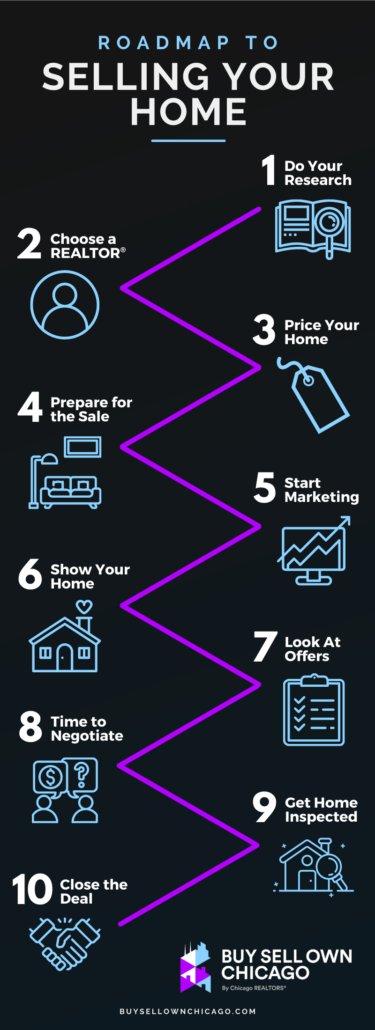
Roadmap to Selling Your Home

Your home holds all of your family’s memories, but maybe it doesn’t fit your needs any longer. When you’re ready to take the step and sell your home, make sure to set yourself up for success. We’ve put together a roadmap of milestones to help you plan out the selling process from start to finish.

  1. Do your research. Once you’ve decided to sell your home, start your research. The housing market has likely changed since you last purchased a home, so find out about mortgage rates, inventory and other aspects of the market that will impact the selling process.
  2. Choose a REALTOR®. Your most important relationship you’ll have as you sell your home is with your REALTOR®. Take the time to search for one, and interview them, to decide who you want with you on this journey. Use our database to start your search for a Chicago REALTOR®.
  3. Price your home. Don’t worry, you don’t have to do this alone! Work with your REALTOR® to look at the current market and comparable homes to set the right price to get your house sold.
  4. Prepare for the sale. Set up a time for professional pictures, schedule showings and plan open houses will take place. Make sure your home is picture perfect to make a great impression on potential buyers. Clean up, declutter and make repairs to get your home in tip top shape.
  5. Start marketing. Work with your REALTOR® to put together a top tier online listing with perfect pictures and a strong description. Then, create a plan to share the listing to get as many eyes as possible.
  6. Show your home. Your marketing worked, and now potential buyers want to check the home out! Work with your REALTOR® on a schedule for showing, and make sure to incorporate a plan to keep everyone safe, like disinfecting surfaces and hosting virtual tours, if need be.
  7. Look at your offers. Yes, it’s possible to receive more than one offer! Sit down with your REALTOR®, review each one and determine which is best for you.
  8. Time to negotiate. Enter a counteroffer to the buyer’s offer based off of what you want. Of course, money is a factor, but timing may also be another big negotiation. Your REALTOR® will help craft your counteroffer based off all these factors.
  9. Get the home inspected. Once you have agreed on an offer, the buyer will set up a home inspection. Your home will be examined for any issues, and repairs can be negotiated by the buyer. Work with your REALTOR® to come to an agreement with the buyer.
  10. Close the deal. Now, it’s time to make things official. During the closing, you will sign the final paperwork and collect your check!

home inspection discussion

Your Home Inspection Questions, Answered!

Congratulations! You’ve made it to your home inspection, which means you’re within reach of closing on your home. Unsure of what to expect? We (and your REALTOR®) here to help.

Why should you have a home inspection done?

Purchasing a home is a big commitment, and a home inspection is your way of knowing you’re making the right fiscal choice. An inspection will spot any current or potential problems within a home, providing safety and peace of mind in the purchasing decision. During the process, your inspector will identify problem areas, suggest solutions and write a report with all of the findings.

Also, many mortgage lenders require an inspection to be performed before financing a home, so it’s best to cover all of your bases by having an inspection completed.

How do I find an inspector?

It is the homebuyer’s responsibility to find an inspector to perform the home inspection. Typically, your REALTOR® will be able to recommend a professional. If you’re interested in looking for one on your own, you can search for a local inspector using the American Society of Home Inspectors’ (ASHI) Find a Home Inspector tool.

When talking with an inspector, here are some things you should look for:

  • They should have a home inspector license.
  • Ideally, hire someone who has at least five years of experience.
  • Make sure they can turn your report around within your required timeframe, as an inspection typically needs to take place within five to seven days of your offer being accepted.

What will, and won’t, an inspection cover?

As a rule of thumb, most inspectors will check a home’s:

  • Exterior, including walls, foundation, grading, roof and garage
  • Interior, including plumbing, electrical, heating, air conditioning, appliances and all rooms

And they will not check:

  • Swimming pools
  • Wells
  • Chimneys
  • Inside pipes or sewer lines
  • Inside walls

What happens on the day of the home inspection?

Both you and your REALTOR® should be in attendance on the day of your inspection. Depending on the size of the home, most inspections take between two and three hours to complete.

Yes, you can ask questions! The inspector will give you firsthand explanations of their findings, point out problem areas and answer any questions that may arise. Everything that is discussed in person will then be written up in their report.

What happens after an inspection?

Once the inspection is complete and you’ve received the report, discuss the findings with your REALTOR®.

Legally, the seller must fix structural issues, building code violations and safety issues. Beyond that, you are able to negotiate with the seller what other issues you would like fixed before purchasing the house. Your REALTOR® will submit a request for repairs that the seller will either agree to or counteroffer.

If the problems that arise from the inspection are too significant or expensive, you always have the right to step away from the purchase if your purchase contract has an inspection contingency. Usually, you have about seven days to make that decision.

While a home inspection may cost money upfront, it will also help you save money, and move forward with a greater peace of mind in the long run.

Make Your Open House A Success

So you’re selling your house, and now it’s time to show it off to buyers! Use these tips, and the help of your REALTOR®, to make a great first impression during your open house.

Make Your Home Open House Ready

Make sure your home is picture-perfect by the time your open house comes around. Here are some things we recommend you take the time to do:

  • Clean Up Clutter: Tuck away additional clutter within your home, including clothes, cleaning supplies, toys and more. If you don’t have a good location to put it all, consider renting a storage unit.
  • Make Your House Spotless: Deep clean every inch of your home, so your windows are spotless and there are no dust bunnies in sight. Don’t have the time? Hire a cleaning service. Your REALTOR® likely has some recommendations for you.
  • Consider Cosmetic Repairs: This isn’t the time to make any big changes, but if you spot chipped paint or burnt out lightbulbs, making those repairs will go a long way in making your house look great!
  • Remove Any Personal Items: When a potential buyer walks into a home, they want to be able to picture themselves in it. Seeing photos of your family and other personal items can hinder that experience, so put them away for the time being. Also, put any valuables in a secure location, just in case.

Get The Word Out

Although your REALTOR® will do a lot of heavy lifting on this front, it doesn’t hurt to give them a hand. Add posts to your social media platforms, such as neighborhood groups, if you’re part of them, to get the word out. Or, if you frequent a local coffee shop or popular store with a bulletin board, don’t be afraid to go “old school” with a flyer.

Also, work with your REALTOR® on a few different aspects of the open house, such as:

  • Setting up yard signs to announce the open house. If you live in a winding neighborhood or subdivision, put signs around the neighborhood to direct visitors to the right location.
  • Add the open house information to your online listing for additional traffic.
  • Decide on the best time to host the event. Sundays are typically the most popular, and other open houses may take place between 1:00 PM to 3:00 PM. Consider starting earlier, around noon, or keep yours open later, until 4:00 PM or 5:00 PM, so you’re not competing for visitors.

Let Your REALTOR® Take the Reins

When the day comes, step back and let your REALTOR® work their magic. Make sure to leave your house (having the seller lurking around isn’t the best look), but keep your phone on you in case your REALTOR® has questions.

Afterward, debrief with them about any questions that came up or comments that were made, and discuss how to address them to get your home sold!

Row of homes in snow

The Ultimate Winter Maintenance To-Do List

As cold weather creeps in, it’s time to start looking at your winter maintenance to-do list. Use this list to start checking off your tasks to prepare for everything that comes with the wintry season.

Check for Drafts

Before Chicago temperatures drop consistently into the single and negative digits, save on your energy costs by addressing drafty entry points. You can save up to 20% each year, according to the U.S. Energy Department. Look for cracks in window caulking or doorway weatherstripping, which are two common causes of drafts.

Inspect Your Roof

Before the first snowfall, check for leaks in your roof! If you don’t know what to look for, a professional roof inspection can determine if there are any issues.

If you want to look for yourself, check for cracks or rust on flashing, warped shingles or build up of moss or lichen (which could mean decay below).

Clean Your Gutters

Clear debris from your gutters to avoid clogs which can lead to dangerous and damaging ice dams. Clogged gutters can cause expensive water damage! Follow these tips to clean your gutters.

Trim Tree Branches

Heavy snow can weigh down branches and even cause them to break off, and you don’t want them hitting and damaging your house! Make sure any limbs or branches around the outside of your home are at least three feet away.

Prep Your Pipes

Water expands when frozen, and if that water is in your pipes, it can cause them to burst. Avoid this by insulating pipes that run through unheated spaces like garages, crawl spaces, et cetera.

If the weather is expected to be particularly cold, consider setting your faucets to drip, which ensures water continues to move through the pipes and doesn’t grow stationary enough to freeze.

Check Smoke and Carbon Monoxide Detectors

Get in the habit of checking your smoke and carbon monoxide detectors once a season to see if their batteries need to be replaced. These are important safety guards!

In the end, winter maintenance doesn’t have to be intimidating! With planning and foresight, your home will be ready for whatever winter brings.